最近《Another Code》的Switch重制版即将发售,并且任天堂发布了体验版,试玩了一下,发现很对我的胃口,于是找了找原作。原作之一是NDS平台的《Another Code 两种记忆》,由Cing开发,任天堂发行。虽然已经有了汉化版,但是似乎是因为技术所限,原有的汉化版仅汉化了文本,没有汉化图片,因此我就来研究一下。
字库
先分析文件结构:
复制代码- └── data
- ├── db_font.bin
- ├── font.bin
- ├── font_lc.bin
- └── pack
- ├── effect.bin
- ├── head.bin
- ├── head.inf
- ├── item.bin
- ├── mystery.bin
- ├── p01_bg.bin
- ├── p02_bg.bin
- ├── p03_bg.bin
- ├── p04_bg.bin
- ├── p05_bg.bin
- ├── p06_bg.bin
- ├── p07_bg.bin
- ├── p08_bg.bin
- ├── p09_bg.bin
- ├── p10_bg.bin
- ├── p12_bg.bin
- ├── p13_bg.bin
- ├── p14_bg.bin
- ├── p15_bg.bin
- ├── p16_bg.bin
- ├── p19_bg.bin
- ├── p20_bg.bin
- ├── p21_bg.bin
- ├── p22_bg.bin
- ├── p23_bg.bin
- ├── p25_bg.bin
- ├── p26_bg.bin
- ├── p27_bg.bin
- ├── p28_bg.bin
- ├── p29_bg.bin
- ├── p30_bg.bin
- ├── p31_bg.bin
- ├── p32_bg.bin
- ├── p34_bg.bin
- ├── p36_bg.bin
- ├── p37_bg.bin
- ├── p38_bg.bin
- ├── p39_bg.bin
- ├── p99_bg.bin
- ├── pda.bin
- ├── sys_bg.bin
- ├── v00_bg.bin
- ├── v02_bg.bin
- ├── v04_bg.bin
- ├── v05_bg.bin
- └── v06_bg.bin
根文件夹下面只有一个data文件夹,其中font.bin和font_lc.bin两个文件大概率就是字库,而且两个文件大小一样,均为280,000字节(还是个十进制的整数)。拿HxD打开一看发现没有明显的文件头,猜测可能直接就是数据文件。有意思的是,font_lc.bin这个文件似乎每个字节都只包含“0”“3”“C”“F”,例如:
复制代码- Offset(h) 00 01 02 03 04 05 06 07 08 09 0A 0B 0C 0D 0E 0F
- 00001600 00 30 00 30 00 CC 00 CC FF 03 30 00 0C 00 03 33 .0.0.Ì.Ìÿ.0....3
- 00001610 00 00 00 00 00 00 00 00 FC 00 30 00 C0 00 00 00 ........ü.0.À...
- 00001620 0C CC 0F 03 0C 00 00 00 00 00 00 00 00 00 00 00 .Ì..............
- 00001630 C0 00 C0 00 C0 00 00 00 00 00 00 00 00 00 00 00 À.À.À...........
- 00001640 00 30 00 30 00 FC 00 FC FF FF 3F FF 0F FF 03 FF .0.0.ü.üÿÿ?ÿ.ÿ.ÿ
- 00001650 00 00 00 00 00 00 00 00 FC 00 F0 00 C0 00 00 00 ........ü.ð.À...
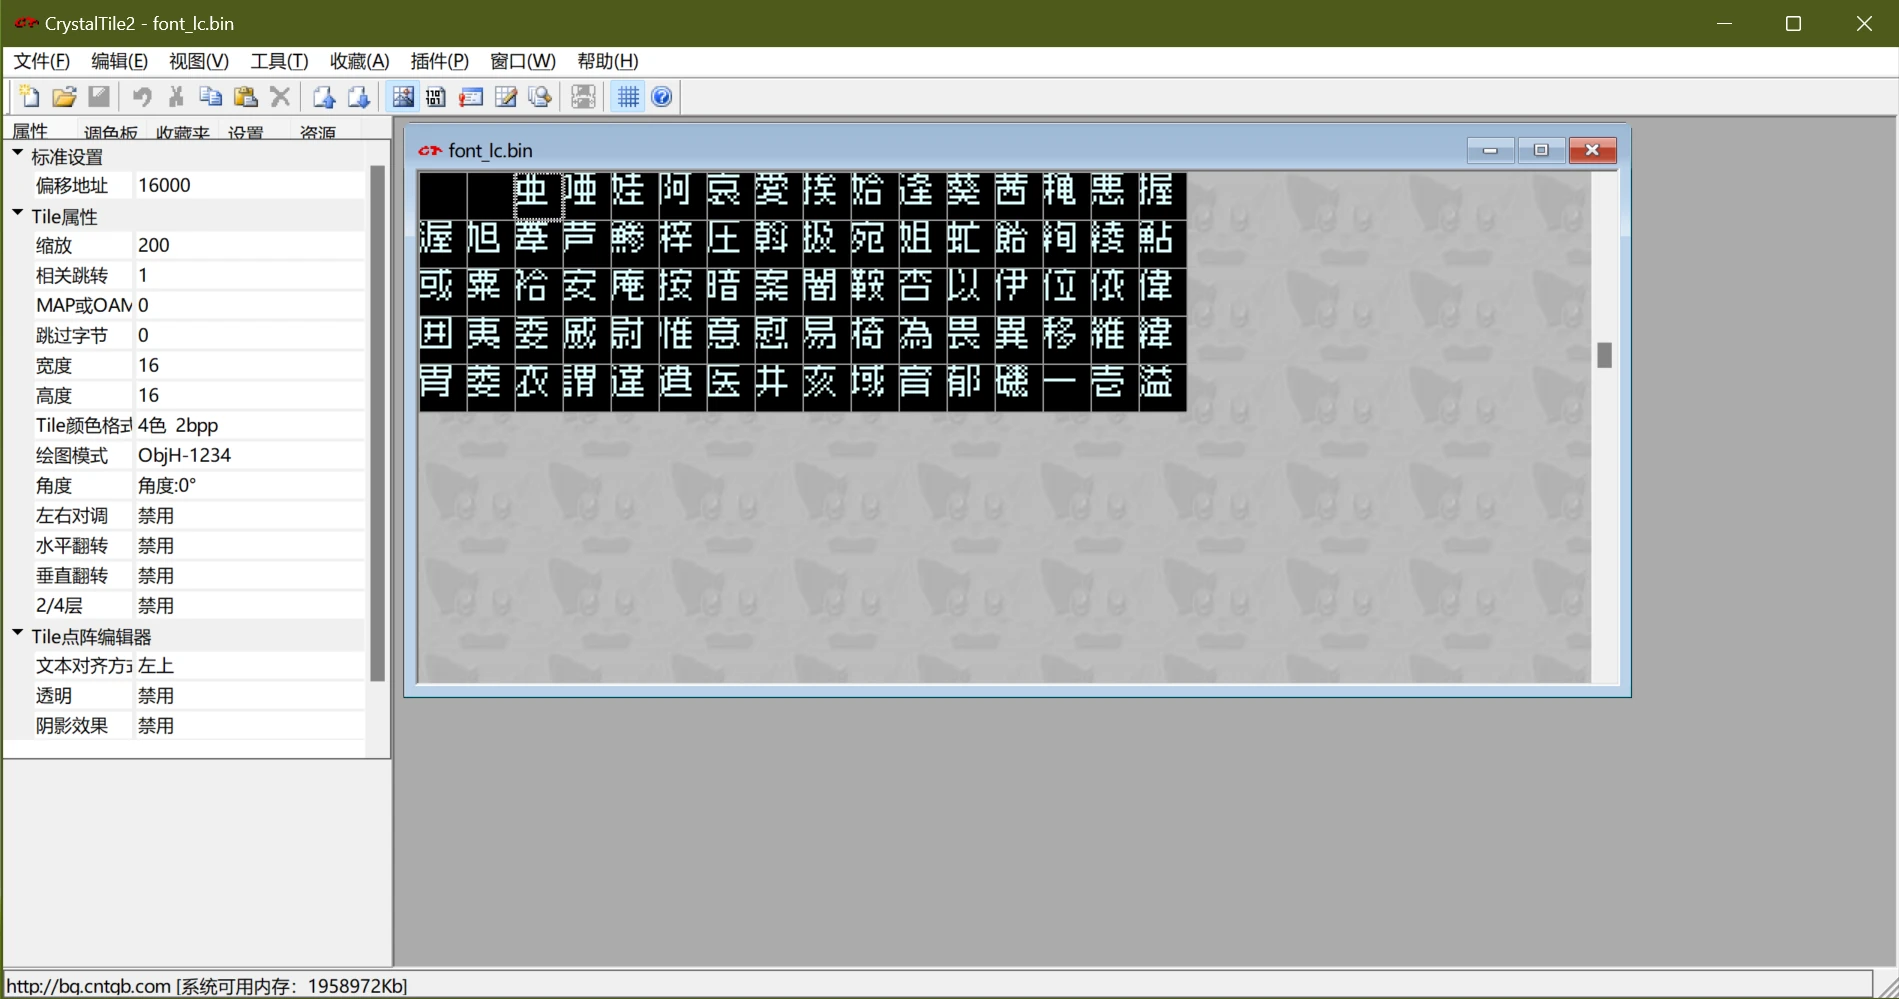
联想到二进制,“0”“3”“C”“F”分别是“0000”“0011”“1100”“1111”,所以推测每个像素点占2 bit,并且这个字体是像素字体。为了直观一点,上CrystalTile2,格式选“4色 2bpp”,宽度和高度均为16(游戏里显示为12x12,但考虑到图块/tile一般是8像素,所以选16x16),绘图格式选ObjH-1234(试出来的),发现能正常读出字库:

接下来就好办了,明显是Shift-JIS排列,如果要汉化的话还要做个对照表。同样的方法也能读出来font.bin的内容,发现font_lc.bin是像素字体,可以用Windows自带的宋体(SimSun)替换;font.bin是衬线字体(某种明朝体),可以用思源宋体(Source Han Serif SC)替换。为了自动化,可以直接拿Python生成新字体。
文本
在ROM的文件里翻了半天,没找到文本,最后想到可能实在可执行文件里面。果然,用Shift-JIS编码打开arm9.bin能找到可读的文本:
复制代码- %f(0)カードナンバー992%hコード SAY919OKO%hセカンド・アナザー起動コード%r格納カードです%h本体にDASを設置すれば%r起動アイコンを作動させます%h%e
这开发习惯不好啊,谁教你们把文本硬编码在可执行文件里的。不过考虑到本作发售算是在DS平台的早期,还没养成文件结构的概念。同样是Cing开发的《愿望之屋 天使的记忆》(也译作“黄昏旅馆 215房间”)的文件结构就很清晰了。
既然硬编码在可执行文件里,改起来就有了一些限制,比如文本长度不能超长,否则就得想办法修改地址。导出脚本也比较难写,首先得筛选哪些才是真正的文本,我的思路是,文本数据的起始位置都是按4字节对齐的,并且文本中不应该有控制字符等不可读的字符。简单筛选之后再手动筛选掉可能不是游戏文本的内容(一些文本可能是调试时的残留)。
图片
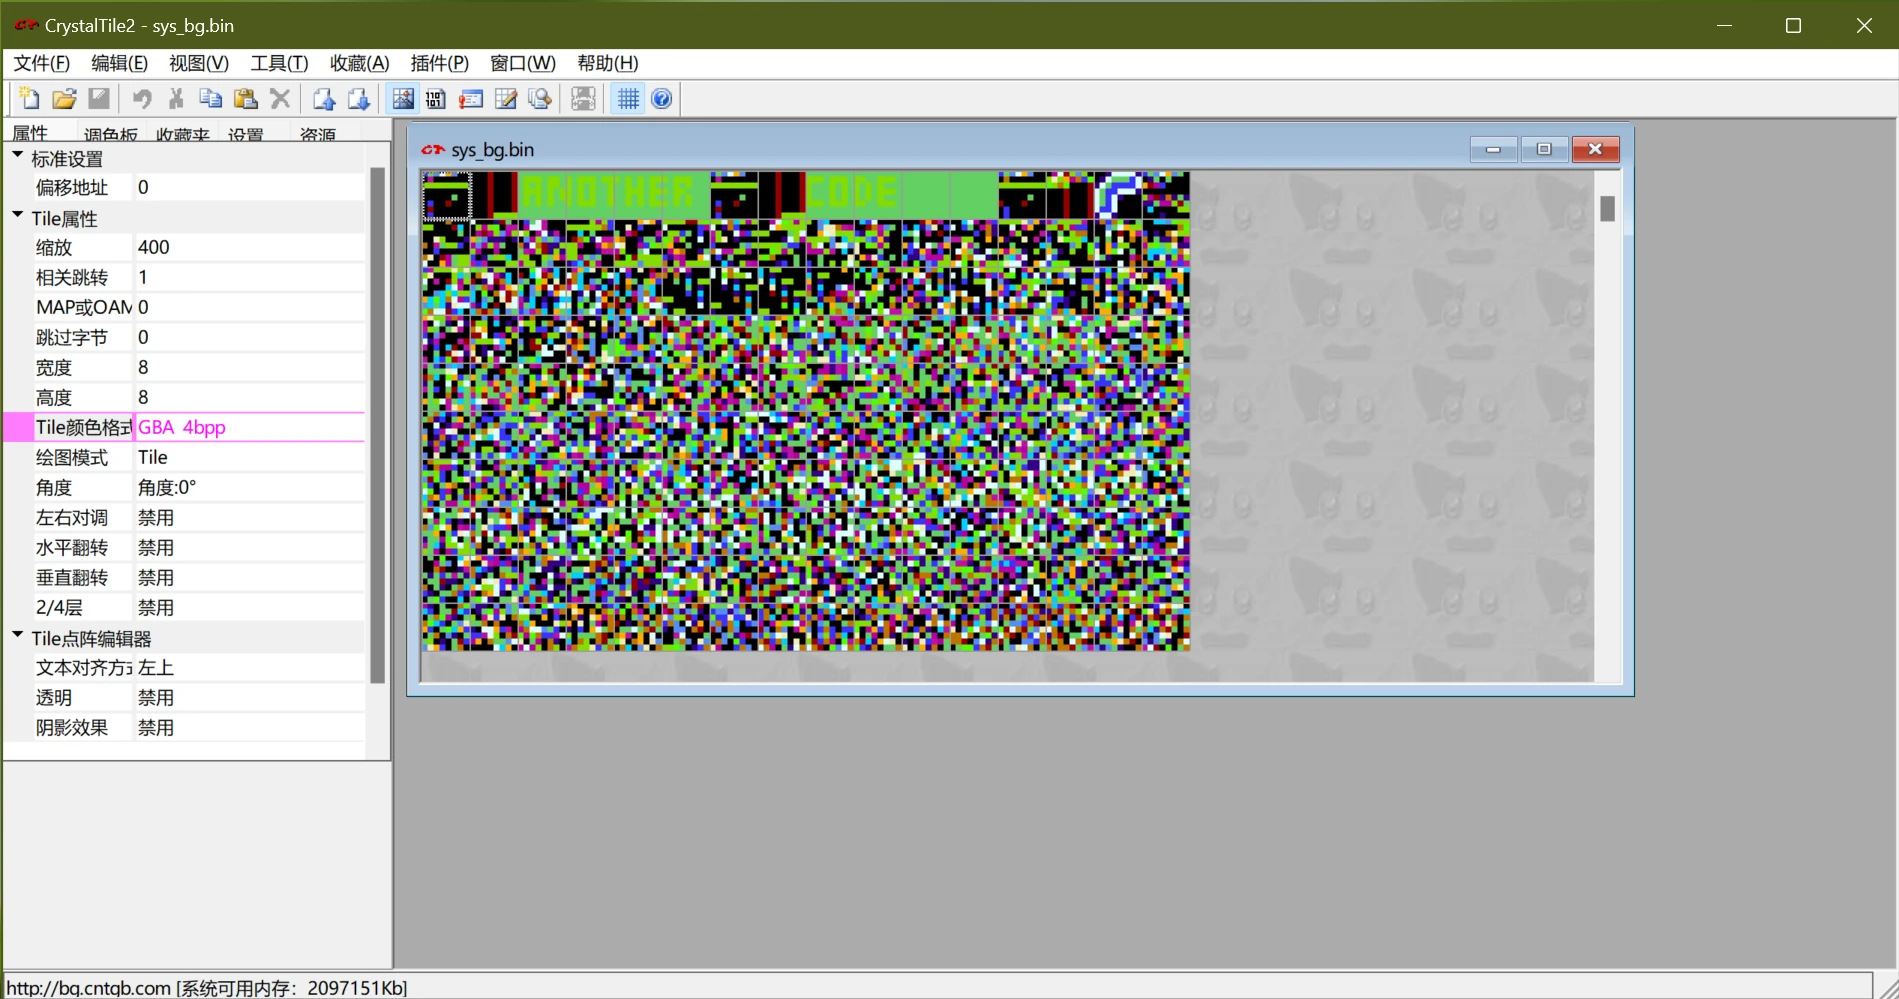
到这里才是重点,也是我最初想研究这个游戏的本意。考虑到data/pack/文件夹下包含了几个*_bg.bin文件,猜测其中包含了图片。先拿CrystalTile2打开sys_bg.bin看看,颜色格式调成“GBA 4bpp”(256色):

最前面可以明显看出来“ANOTHER”和“CODE”两个图片,但是后面就读不出来了。没办法,还得分析文件结构。
打包文件
再次研究data/pack/文件夹,发现只有head.inf这个文件和其他文件的后缀不一样。拿HxD看一下:
复制代码- Offset(h) 00 01 02 03 04 05 06 07 08 09 0A 0B 0C 0D 0E 0F
- 00000000 63 68 61 72 61 5F 62 67 00 00 00 00 00 00 00 00 chara_bg........
- 00000010 00 00 00 00 80 08 00 00 00 00 00 00 72 00 69 63 ....€.......r.ic
- 00000020 63 68 61 72 61 5F 6D 64 6C 00 00 00 00 00 00 00 chara_mdl.......
- 00000030 80 08 00 00 E0 02 00 00 00 00 00 00 72 00 69 63 €...à.......r.ic
- 00000040 65 66 66 65 63 74 00 00 00 00 00 00 00 00 00 00 effect..........
- 00000050 60 0B 00 00 A0 09 00 00 00 00 00 00 65 00 66 65 `... .......e.fe
- 00000060 69 74 65 6D 00 00 00 00 00 00 00 00 00 00 00 00 item............
- 00000070 00 15 00 00 C0 04 00 00 00 00 00 00 6D 00 75 69 ....À.......m.ui
可以看出来每0x20个字节为一个文件,结构大致为(以下数据结构均为小端序):
| 偏移量 |
大小 |
说明 |
| 0x00 |
0x10 |
文件名,ASCII编码。 |
| 0x10 |
0x04 |
偏移量。 |
| 0x14 |
0x04 |
数据大小。 |
| 0x18 |
0x04 |
未知1,固定为0。 |
| 0x1c |
0x04 |
未知2,可能是某种hash。 |
这里的偏移量指的是在data/pack/head.bin文件中的偏移量,而head.bin的文件结构与head.inf是一致的,其偏移量是XXXX.bin(其中XXXX是head.inf中的文件名)的偏移量。如果文件名以END\0为起始,则说明当前文件的数据结束。根据这个文件结构可以从打包文件中拆分出独立的文件。
解压算法
拆分出独立文件后,可以发现sys_bg.bin中能解析成图片的是a_code0.bin和a_code1.bin,其他的文件比较难以解析。用HxD读取后发现,能解析的两个文件的文件头是12 3D DA 00,而不能解析的文件的文件头是12 3D DA 01。以“"12 3D DA 01"”为关键词搜索,发现了一篇文章:Resource Reverse Engineering: Hotel Dusk: Room 215。正好Hotel Dusk: Room 215(《愿望之屋 天使的记忆》)也是Cing开发的游戏。根据这篇文章,这些拆出来的独立文件的结构应该是:
| 偏移量 |
大小 |
说明 |
| 0x00 |
0x04 |
文件头。12 3D DA 00为未压缩,12 3D DA 01为已压缩,除此之外则不适用此格式。 |
| 0x04 |
0x04 |
压缩前大小。对于未压缩文件应该为总文件大小 - 0x10。 |
| 0x08 |
0x04 |
压缩后大小。对于已压缩文件应该为总文件大小 - 0x10,对于未压缩文件应该为FF FF FF FF。 |
| 0x0c |
0x04 |
未知,固定为0。 |
| 0x10 |
压缩前大小 |
压缩/未压缩的数据。 |
文章作者给出来了C#写的解压算法,可以直接拿过来用,我用Python改写了一下:
复制代码- import struct
- # Thanks to: Jason Harley
- # Reference: https://github.com/Jas2o/KyleHyde/blob/main/KyleHyde/Formats/HotelDusk/Decompress.cs
- def decompress(compressed: bytearray | bytes) -> bytearray:
- header, sizeun, sizeco, zero = struct.unpack("<4I", compressed[:0x10])
- if header == 0x00da3d12:
- return bytearray(compressed[0x10:])
- elif header != 0x01da3d12:
- return bytearray(compressed)
- uncompressed = bytearray(sizeun)
- uncompressed_pos = 0
- compressed_pos = 0x10
- while compressed_pos < sizeco + 0x10:
- input = compressed[compressed_pos]
- compressed_pos += 1
- for i in range(8):
- if compressed_pos >= sizeco + 0x10:
- break
- bits_i = input & 1
- input >>= 1
- if bits_i:
- uncompressed[uncompressed_pos] = compressed[compressed_pos]
- compressed_pos += 1
- uncompressed_pos += 1
- else:
- offset, len = struct.unpack("<HB", compressed[compressed_pos : compressed_pos + 3])
- offset = (offset + 0xff + 4) & 0xffff
- len += 4
- compressed_pos += 3
- while offset < uncompressed_pos - 0x10000:
- offset += 0x10000
- if offset < 0 or offset + len >= sizeun:
- for x in range(len):
- uncompressed[uncompressed_pos + x] = 0
- else:
- for x in range(len):
- uncompressed[uncompressed_pos + x] = uncompressed[offset + x]
- uncompressed_pos += len
- return uncompressed
压缩算法
压缩算法实际上就是把解压算法反过来,不过解压好写,压缩不好写。分析一下前文给出的解压算法可以发现,这种压缩算法的大致思想是:如果一段数据在前面出现过或者全是0x00,并且这段数据的长度至少为4,那么就可以压缩到3个字节,其中前2个字节标记这段数据在前面出现的位置,最后一个字节标记这段数据的长度。如果找不到这样的一段数据,那么就直接把原始字节保存到压缩后的文件中。
因此,可以写出一个压缩算法,其大致思路为:对于给定文件中的某个位置,检查其后的4字节序列在前面是否出现过。如果没出现过,则再检查是否全为0,如果全为0则返回对应的压缩后的模式,否则直接返回原始字节。如果出现过,则采用双指针的方式向后匹配到最大相同字节序列;如果有多次出现则选取匹配长度最长的地方。
我的实现脚本:
复制代码- import struct
- def compress(uncompressed: bytearray | bytes) -> bytearray:
- def find_largest(uncompressed: bytearray | bytes, uncompressed_pos: int) -> tuple[int, int, int]:
- start = max(0, uncompressed_pos - 0x10000)
- before = uncompressed[start :]
- after = uncompressed[uncompressed_pos : uncompressed_pos + 4]
-
- max_len = 0
- max_len_offset = -1
- offset = before.find(after)
- while offset > -1 and start + offset < uncompressed_pos:
- this_len = 4
- while offset + this_len < len(before) and uncompressed_pos + this_len < len(uncompressed) and this_len < 0x103 and before[offset + this_len] == uncompressed[uncompressed_pos + this_len]:
- this_len += 1
- if this_len > max_len:
- max_len = this_len
- max_len_offset = start + offset
- offset = before.find(after, offset + max_len)
- if max_len_offset != -1:
- return 0, max_len_offset, max_len
- if uncompressed[uncompressed_pos:uncompressed_pos + 4] == b"\0\0\0\0":
- zero_pos = uncompressed_pos + 4
- while zero_pos < len(uncompressed) and zero_pos < uncompressed_pos + 0x103 and uncompressed[zero_pos] == 0:
- zero_pos += 1
- if zero_pos < 0xffff:
- zero_len = zero_pos - uncompressed_pos
- return 0, 0x10000 - zero_len, zero_len
- return 1, 0, 0
- compressed = bytearray()
- compressed.extend(struct.pack("<4I", 0x01da3d12, len(uncompressed), 0, 0))
- uncompressed_pos = 0
- bits = 0
- while uncompressed_pos < len(uncompressed):
- bits_pos = len(compressed)
- compressed.append(0)
- bits = 0
- for i in range(8):
- if uncompressed_pos >= len(uncompressed):
- break
- bits_i, max_len_offset, max_len = find_largest(uncompressed, uncompressed_pos)
- if bits_i == 0:
- real_offset = (max_len_offset + 0x10000 - 0xff - 4) & 0xffff
- real_len = max_len - 4
- compressed.extend(struct.pack("<HB", real_offset, real_len))
- uncompressed_pos += max_len
- else:
- compressed.append(uncompressed[uncompressed_pos])
- uncompressed_pos += 1
- bits |= (bits_i << i)
- compressed[bits_pos] = bits
- if len(compressed) - 0x10 > len(uncompressed):
- compressed = bytearray()
- compressed.extend(struct.pack("<4I", 0x00da3d12, len(uncompressed), 0xffffffff, 0))
- compressed.extend(uncompressed)
- else:
- compressed[0x08:0x0c] = struct.pack("<I", len(compressed) - 0x10)
- return compressed
经过检查,将游戏中解压出来的数据使用我的压缩算法压缩后再解压,能够得到与原来完全相同的文件,并且导入到游戏中也没有发现错误。
图片格式
同样参考那篇文章,得到图片的文件结构:
| 偏移量 |
大小 |
说明 |
| 0x00 |
0x02 |
未知,固定为00 00,可能用于区分其他文件。 |
| 0x02 |
0x02 |
未知。 |
| 0x04 |
0x02 |
宽度。 |
| 0x06 |
0x02 |
高度。 |
| 0x08 |
0x02 |
数据大小。 |
| 0x0a |
0x02 |
未知。 |
| 0x0c |
0x02 |
调色板大小。 |
| 0x0e |
0x02 |
未知,固定为00 00。 |
| 0x10 |
调色板大小 |
调色板数据。调色板大小有两种,0x20和0x200,分别对应16色和256色。每个颜色为2个字节,格式为HRRRRRGG GGGBBBBB,其中R、G、B分别为红、绿、蓝,每个分量占5位,最高位H一般为1。 |
| 0x10 + 调色板大小 |
数据大小 |
图片数据。图片使用的是索引颜色,16色图片每个像素为4位(半个字节),256色图片每个像素为8位(一个字节)。 |
图片数据中,各像素点的排列方式有所不同。通常情况下,排列方式与字库一样是ObjH-1234格式,也即:按照从左到右、从上到下的顺序读取8x8像素的数据作为一个图块(tile),然后按照从左到右、从上到下的顺序读取图块。python的生成器实现:
复制代码- def get_xy_objh_1234(width: int, height: int) -> Generator[tuple[int, int], Any, None]:
- for y_1 in range(0, height, 8):
- for x_1 in range(0, width, 8):
- for y_2 in range(8):
- for x_2 in range(8):
- yield x_1 + x_2, y_1 + y_2
但是有一些图片是按照Tile格式排列的,也即:直接按照从左到右、从下到上的顺序读取图片。python的生成器实现:
复制代码- def get_xy_tile(width: int, height: int) -> Generator[tuple[int, int], Any, None]:
- for y in range(height):
- for x in range(width):
- yield x, height - y - 1
如何区分两种格式我还没有找到规律,但是可以发现所有尺寸为32x32和128x96的图片都是Tile格式的,其他尺寸的图片大部分是ObjH-1234格式的。
重新导入
按照导出的方法逆过程导入回去即可。其中压缩算法不太好写,最初我直接导入了未压缩的数据,经测试也能用,只不过因为恰好使ROM大小超过了32 MiB,需要对ROM扩容。之后研究了一下压缩算法,发现也不太难。
结语
汉化相关的构建脚本已在GitHub上开源,并已发布汉化成果。